

Sewing Basics: How to take body measurements for sewing patterns
Taking your measurements is one of the best ways to improve the fit of your handmade clothes. It helps you choose the closest pattern size before you cut into your fabric. And it shows you where a small adjustment might help.
Remember that your measurements are points of data, not a judgement on your body. Bodies change over the years, through health, recovery and everyday life, and that’s completely normal. Take a breath, be kind to yourself, and treat these numbers as a road map to a better fit.
It’s worth measuring afresh at the start of every project, not just once. Keep your numbers somewhere handy and you’ll soon spot your usual range. Some weeks you might sit between two sizes, and that’s fine to plan for.
Most sewing patterns size from three measurements: bust or chest, waist and hips. Many patterns also list finished garment measurements, which give the size of the sewn garment. The gap between your body and those finished measurements is the wearing ease. A closer-fitting garment has less ease, while a looser style has more.
Watch our FREE video workshop on taking accurate measurements to learn more:

You can change the video caption language in your YouTube settings. Click here to learn how.
Before you start measuring
You’ll need a soft tape measure, a full-length mirror, and somewhere to write your numbers down.
It’s worth checking your tape hasn’t stretched over time. Hold it against a ruler now and then to make sure it’s still accurate.
Wear your usual underwear and the bra you’d normally wear under your clothes. Try not to measure over bulky clothing, as it adds width you don’t really have.
Stand naturally and keep the tape snug, but not tight. Check in the mirror that it sits level all the way round. And don’t hold your breath. You want your clothes to fit as you move, sit and breathe.

Women’s body measurements
1. Height
Height matters because many patterns are drafted for a set body height. If you’re taller or shorter, you may need to lengthen or shorten the pattern to suit.
This one’s hard to do alone. Stand against a door frame or wall, then mark the top of your head with a little tape or a soft pencil. Step away and measure from the floor to your mark.
2. Bust
Measure around the fullest part of your bust. Keep the tape level across your back and let it sit smoothly all the way round. This is one of the key measurements for choosing your starting size.
3. Upper bust
Your upper bust, sometimes called the high bust, sits above the bust and just under your armpits. Keep your arms down and your shoulders relaxed as you measure. You won’t always see it on the pattern envelope, but it’s a real help for fitting a bodice.
Compare your upper bust with your full bust. A bigger difference points to a Full Bust Adjustment, and a smaller one to a Small Bust Adjustment.
4. Waist
Your waist is where your body naturally bends. The old advice says your waist is the narrowest part of your torso. But that isn’t true for everyone.
Pop the tape, or a piece of string, around where you think your waist sits. Bend gently from side to side and let it settle into place. Once it feels right, take your reading.
5. Neck to waist
This helps you check whether a bodice waistline will land in the right place. It’s especially handy for dresses, fitted tops and anything with a defined waist.
Measure from the nape of your neck down to your waist. If that’s tricky on your own, mark both points on a door frame and measure between them. It’s also a good way to compare your torso length with the pattern.
6. Hips
Measure around the fullest part of your lower body. That might be your hips, your bottom, or a little lower than you’d expect. This is another key measurement for choosing your size.
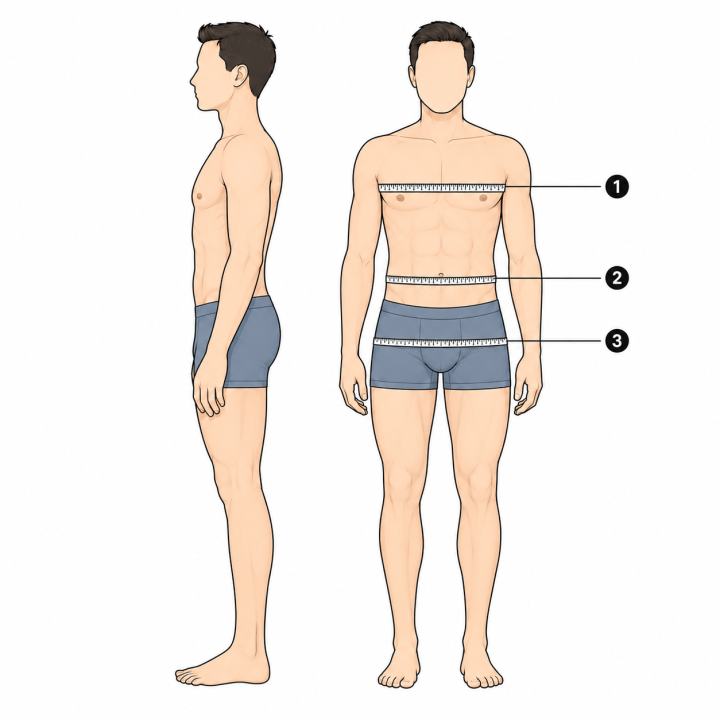
Men’s body measurements
Men’s patterns tend to focus on three main measurements: chest, waist and hips. Together they give you a solid starting point for choosing a size.
1. Chest
Measure around the upper torso, straight across the chest. Keep the tape level and comfortable, without pulling it tight. This is the main upper-body measurement for men’s patterns.
2. Waist
Measure around the natural waistline. That’s where the body bends, not where trousers happen to sit. If you’re making trousers to sit lower than the natural waist, measure where you want the waistband to sit as well.
3. Hips
Measure around the widest part of the hips and seat, keeping the tape level all the way round. This one’s especially useful for trousers, shorts and close-fitting garments.
Measuring while seated
If you sit for long periods, or you use a wheelchair, take your measurements while seated too. Our shape changes when we sit, and the waist, hips and thighs can all measure a little larger.
This matters most for fitted garments and fabrics with little or no stretch. A garment can feel just right standing up, then pull the moment you sit down.
Here’s the easiest way to do it. Take your standing measurement first, then hold the tape in place and sit down gently, letting it slide through your fingers so it stays at the same level. Use a firm, flat chair rather than a soft sofa.
A few extra measurements for a better fit
Once you have your main numbers, a few extras help you fine-tune.
Measure your bicep around the fullest part of your upper arm. It tells you whether a close-fitting sleeve will feel comfortable.
Measure your neck gently, just above the collarbone. This is the one for shirts, collars and higher necklines.
For trousers, measure your crotch length with a piece of string. Start at the front waist, pass through the crotch, and finish at the back waist. You can also measure the front rise and back rise on their own.
Measure around the fullest part of your thigh for trousers or shorts, so the legs won’t feel too tight.
And measure from shoulder point to shoulder point if tops often pull, slip or sit badly at the shoulder. To find the shoulder point, raise your arm and feel where the bone moves.
When you check these against the paper pattern, measure along the stitch line. Don’t include the seam allowance.
Choosing your pattern size
Write down your bust or chest, waist and hips first. Then compare them with the pattern’s body measurement chart.
Don’t be surprised if your pattern size looks nothing like the size you buy in the shops.
You may not land neatly in one size, and that’s completely normal. You might match one size at the bust and another at the hips.
When that happens, you can often grade between sizes. That simply means drawing a smooth line from one size to the next on the pattern. It’s worth checking both the body measurement chart and the finished garment measurements before you decide how much to change.
If the garment has plenty of ease, you may not need to adjust every small difference. If it’s close-fitting, take a little more time to check the pattern before you cut.
Good measurements are about helping the pattern work for you. Once you know your numbers, you can sew with more confidence and make clothes you’ll love to wear.