Brilliant buttonholes
Buttonholes don’t need to be scary! Let us show you how a few steps of preparation are all you need for success.
PREPARATION
Always test a buttonhole on a scrap of the same fabric with stabiliser to check it stitches as you want it. And ensure you replicate the number of layers the real buttonhole will be sewn through.
Support
All buttonholes should have some sort of stabiliser beneath them as this one of the keys for achieving neat results. This may be the interfacing between facing and main fabric, a special waist banding stiffener or a layer or tear-away or soluble stabiliser placed beneath the fabric. This helps when stitching, preventing puckering or pulling and helps keep the area stable when buttoned up.
Needle
Make sure your needle is fresh and sharp, plus it’s the correct weight and size for your fabric. Buttonholes are made with lots of compact zigzag stitches (satin stitch) worked closely together, thus lots of needle penetration through three or more layers. Ensure any seam allowance that may get caught in the buttonhole and create even more layers is trimmed back.
Position
The vertical centre line of your buttonhole should be at least 1.5cm in from the edge (as mentioned your seam allowance should be trimmed out of the way). Buttonholes on shirts and dresses are generally vertical, with perhaps one horizontal button at the collar (if applicable). On trousers, skirts, and outerwear, they are generally horizontal. Buttonholes are generally evenly spaced but you can of course play around with buttons grouped into pairs or clusters.
Marking
I like to use water erasable pen or pencil to make an easy-to-see crisp line that won’t be permanent. Thread basting lines is ideal on couture garments. Mark the top and bottom lines to indicate where stitching should start and finish, then the vertical line. If you have a one-step buttonhole on your machine, you can get away with just marking the bottom position.
TYPES OF MACHINE BUTTONHOLE
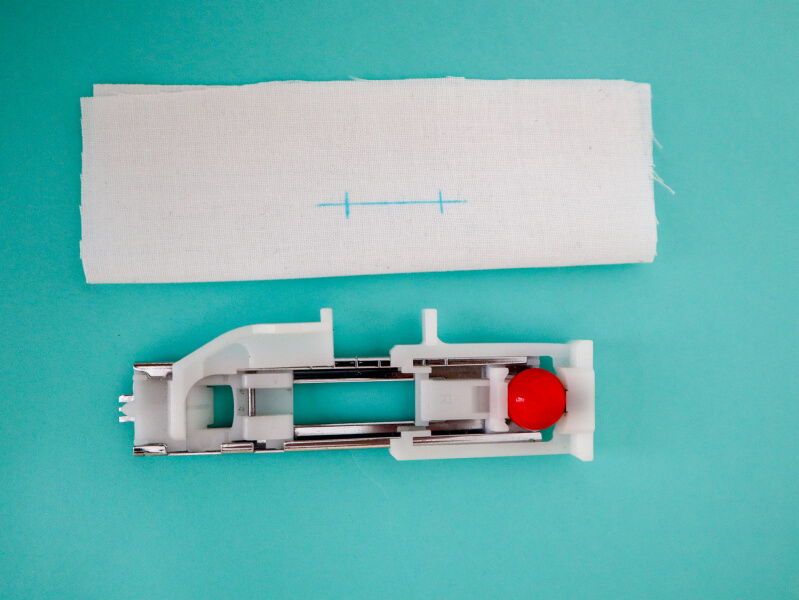
The one-step buttonhole foot
The buttonhole foot supplied with today’s modern sewing machines is generally white, long and has a cache at the back to fit a button into. At the front are two little prongs, with one prong at the back (these are for making corded buttonholes). Down the left side are two lugs that jut out and actually indicate the finished length of your buttonhole.
Firstly, push the second lug backwards to open up the cache at the back. Fit a button into it and then pull the lug forwards to hold the button snugly. The distance will be slightly larger than your button to accommodate the stitching. (If you have a bulky button with a shank that won’t lay flat, don’t worry, once the gap has been created the button can be removed – just make sure you don’t adjust the gap.)
Attach the foot and then pull down the buttonhole lever which is tucked up behind the needle to the left of the machine. Select your buttonhole and your machine is all ready to go. The little lugs on the buttonhole foot work will hit the lever as an indication that the stitching should stop at that point.
Four-step buttonholes
Older machines will have three buttonhole settings to complete the left and right sides, plus the top/bottom stitches. You will get a foot that is again set to the correct length for the buttonhole but you will have to stop the stitching yourself at the precise point. You have to change the stitch setting as you work through the four sides of the buttonhole so it will take you longer to complete. This is one of the biggest reasons I hear of people upgrading their machines and must agree it’s a big benefit to move to one step buttons.
Keyhole buttons
This variation on a buttonhole as a circular opening at one end. This is designed for shank buttons and is perfect for heavy duty project like denim jeans or coats. It provides a little extra room for the shank on the back to sit without stretching out the stitching. You don’t have to use this shape on all shank buttons but for waistbands it’s the smart choice to help them withstand any strain.
OPENING A BUTTONHOLE
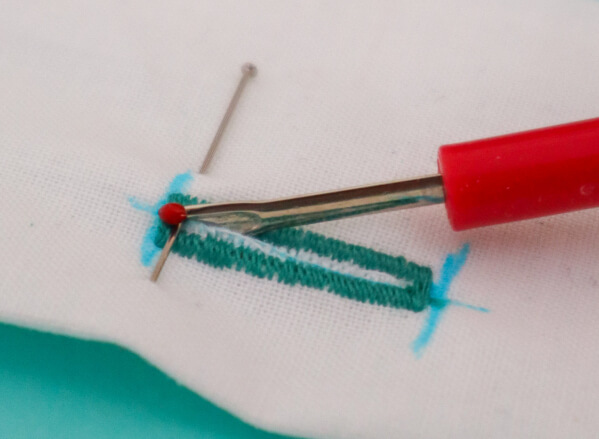
The simplest way to open your buttonhole is to place a pin across the top, just inside the stitching line then run a seam ripper along the gap. The pin will ensure your seam ripper doesn’t cut any further than needed!
Things gone wrong? Unpick unwanted buttonholes from the BACK – it’s much easier and there’s less risk of tearing your fabric
3 TOOLS TO HELP SEW FLAWLESS BUTTONHOLES
A few handy sewing room accessories can help reduce your stress and improve the durability of your buttonholes.
A buttonhole chisel
These miniature chisels are available in different sizes and some come with small cutting boards or mats included. The tapered sides reduce the risk of accidentally cutting your buttonhole stitching and the sharp blade makes quick work of opening buttonholes.
If your buttonhole is large you’ll need to make a couple of side by side presses to cut the fabric open but it’s must less stressful than using an unpicker or scissors!
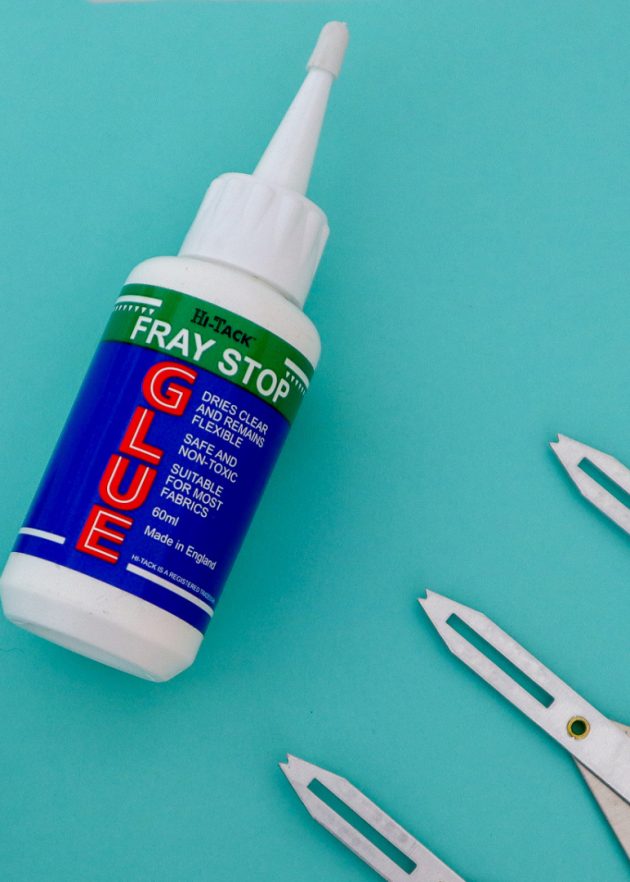
Fray Check or Fray Stop.
There’s several brands of this clever product. It prevents stressed areas – such as buttonholes, seams, shirt collars, and cuffs – from fraying by reinforcing the fibres with glue. It’s also perfect to secure thread ends on seams and overlocked edges. Some people also use it on the edges of homemade appliques and motifs.
If you like to get a long life out of your garments with many wears and washes, Fray Check can provide extra peace of mind. It’s a colourless liquid that works on most fabric types without leaving a visible stain and has a easy to use nozzle so you don’t apply too much.
Simflex
This buttonhole gauge simplifies positioning and measuring of buttonholes. You can also use it to evenly space pleats on skirts or anything else you need to distance equally. All of our patterns indicate button spacing for the suggested button size. But if you want to change your button size it can help to also adjust the spacing. Similarly, you may prefer more buttons than we recommend, and as always you are in control!
The simflex will mark where the centre of the buttonhole/button should go. Place the top guide in position at the first button point (at the neckline or upper chest depending on the garment) and then expand the guage until you achieve the spacing you want. Remember, it’s crucial a button should sit in the centre of your bust and just above a waist seam to avoid gaping. Mark the spacing and then create buttonholes in the correct locations.
